This article is about the first time I ever installed AC in my 1988 Mazda B2200 pickup truck. It was a base model and came without AC and I didn’t figure out how to install it until 2015. This was saved from an old blog I had years ago.
The year was around 2015 so the blog is dated.
This is not exactly a HOW-TO, just an informative post on my dealings with installing Air Conditioning in my truck. This may help others…
Yes, it’s been a while since I have written anything on this blog. I have pretty much stopped writing things all together for this “blog” as Facebook and other sources have almost killed most blogs like this. I have also been pretty busy in other interests one of which has brought me to writing this post.
You see I have what some would consider an “old school” mini truck, and have had it for all of its life.
My truck is a 1988 Mazda B2200 and I think I have posted about it on here before when I did a revitalization post about it and how I made some updates to it.
It wasn’t until I got a new car that I realized how awesome “new” could be. When I would alternate vehicles I would feel as if my truck was speaking to me saying “why have you forgotten me, why have you let me go” and I began to bring it up to speed and try and modernize it. I joined a few “Mazda” groups on Facebook to get inspired and see what everyone else might be doing, and later created a group of my own.
I wanted the truck to have most of the amenities of new vehicles of today.
I had already made lots of improvements to the truck over the years, like a new crate engine back in 1998, and a Weber 32/36 carburetor with pacesetter header install, which by far is one of the best mods ever as it will allow you to get rid of all the emission tubing and vacuum lines making the engine bay a lot cleaner and hassle free to work on.
I later shaved the intake, added power windows and locks, new custom door panels that holds new speakers and the power window switches. New bucket seats, lots of new interior pieces and tint, all new front suspension, driveshaft, you name it, its been done. Too many to new things to list here today. This truck is practically new, but needs a repaint. Now all that was really missing was AIR CONDITIONING.
Installing Air Conditioning in this truck was the biggest accomplishments that I completed next to replacing engine. This was an absolute huge deal as the truck came completely without it! This truck was born a base model.
Not many will ever understand what it was like growing up, driving this truck through high school, on dates with your girlfriend, driving all over the state for work, and have no AC in the dead heat of Mississippi…. to now actually installing it, and feeling cold air coming from 29-year-old vents that have never felt it in my own truck. When I did this, I was elated! The happiest I had been in a long time! A super feeling of accomplishment. It was absolutely amazing.
To get to the point of doing it myself, I have to tell you how I got to that point.
I had tried for a while to source a “kit” or have a local mechanic shop do it but they wouldn’t even touch it. One quote at that time was over $2000.
I was afraid to tackle this as I am merely a driveway mechanic, a pretty decent one, but still no professional.
That is what brings me here today writing this lengthy post. Many others from the Mazda pages and forums want to know what all is needed, and how it was done, so here I am writing this post on my own personal blog to help the others that want to do the same to their trucks.
Lets get on with it!
This will not be a complete step by step, because when I was doing the job I wasn’t planning on it being a step by step, so I didn’t take enough pictures.
If you get ANYTHING from this document it needs to be this.
NEVER add anything like a sealer or refrigerant with a sealer to ANY AC system !!!!
All this will do is clog things up. If there is a leak, address the leak, and fix it. Sealers are not fixes.
If you completely tear your ac system apart, and make it fresh and new with new seals and a few parts, you will get wonderfully cold air conditioning.
Do not cheat yourself of this.
One of the first things I did was Research! Research! Research!
I looked at a friend’s Mazda, junk yard Mazda’s and books/manuals and watched YouTube videos, to determine all the parts that I needed. Remember my truck is a base model so I needed know and understand everything since this truck came with NOTHING. Use YouTube to get a better overall understanding of how AC works before you start. I recommend these to start with:
Understanding evacuating and recharging.
This gives you an idea on how to use a pump and gauges.
Tools Needed/Used:
Pressure Gauges
Depending on the refrigerant used, you will need a set of gauges to monitor pressures. These can be purchased on amazon, harbor freight, or even borrowed for free from a local parts store through the loan a tool program. Many stores offer this.
Flush Kit
The flush kit from AutoZone was especially useful. I used it to clean out the used condenser and evaporator I got from a parts truck.
Vacuum Pump
Also I used a vacuum pump from AutoZone through the loan a tool program.
Parts Needed:
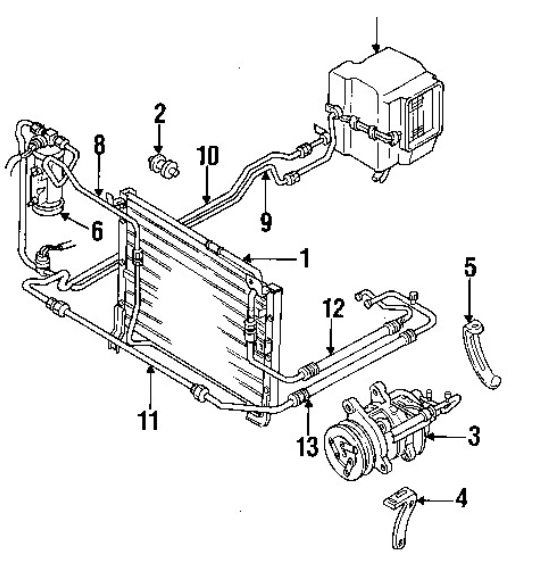
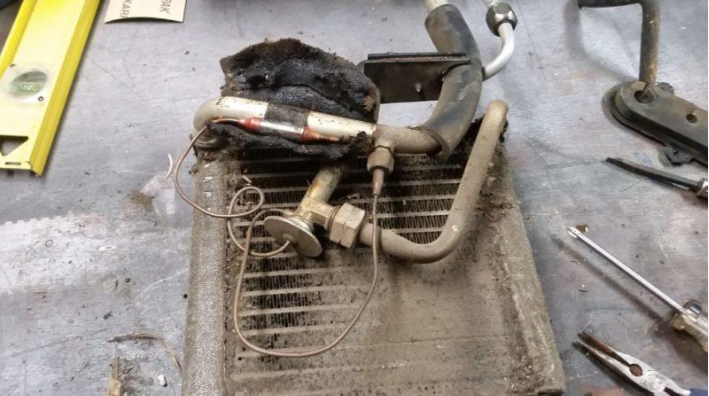
Compressor #3 on image below
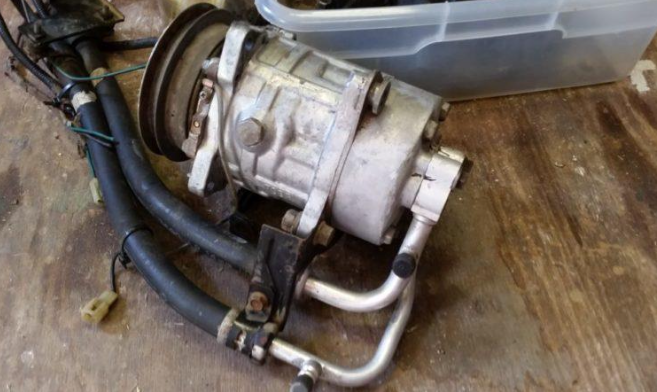
If you have a good original one, this is great. They no longer make the Sanden 705/708 new anymore. They sell re-manufactured ones that I hear do not hold up for very long. This could be due to user error, not fully preparing the ac system for the new compressor. I had a used one that was in good working order. I had to replace the clutch bearing and that was all.
Condenser #1 on image below
This is a rather hard piece to now find for our trucks. I tried RockAuto and they claim to have one but after 3 times I am convinced they do not know what they think they have. The one they sell if they still try and sell it, does not attach to the OEM lines at all. Your best bet here is to find a good used one and clean it really well, flush it out, and if it leaks, get it patched if possible.
Receiver Drier/Accumulator #6 on image below
I ordered one from RockAuto Part # 33485 and it came to me without a low pressure switch. I emailed them and they sent me another one with the pressure switch attached and told me to just keep the one they sent me. Good people.
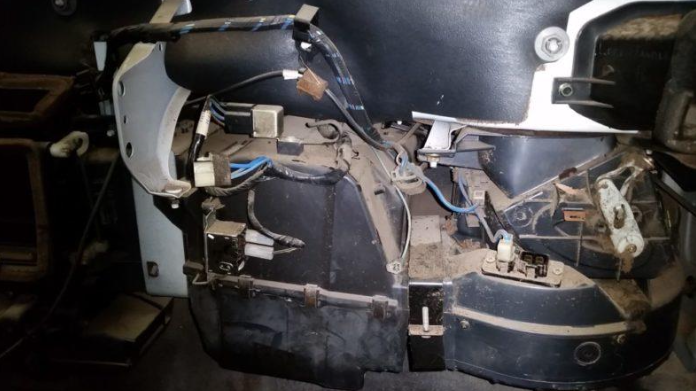
Evaporator (behind glove compartment)
This is not numbered on the image below, but it’s the part that is enclosed in plastic case under the dash. You do not have to take the dash out to get this part in or out. I have heard on some forums that the ones that are sold today are cheaply made. I have no idea, but they can be ordered from RockAuto part # 54800.
The one that I used came from a parts truck and upon visual inspection looked to be fine so I flushed it really well and it is indeed just fine.
Expansion Valve
I ordered this from RockAuto Part # 38610
Valve Core and Cap kit
I ordered this from RockAuto Part # 26777
Refrigerant
You will need to decide R12 or R134A.
You can still get R12 but it’s hard and usually only on e-Bay. It is very expensive too. These trucks were designed to use R12. The compressor is built to compress the molecules of the R12 way better than R134A. The condenser is small as well, and designed for R12. R12 will cool faster, less overall strain on the system than R134A, but again it’s hard to obtain and only getting harder as it is no longer made and reserves are drying up. If you get it to work on R12, thats great but what about a leak in the future or compressor replacement?
With this in mind I went ahead and chose to convert the system to R134A. I purchased my cans from Wal-Mart, or you can get some online on Amazon.
(Update: I now use Duracool as a refrigerant as its performance is just like R-12)
Aluminium hoses/lines #8,9,10,11,12 on image below
Some of these can be purchased online. At the time of this writing, I can only find #8 and #11 for sale online. The rest are no longer available (obsolete), and you will have to resort to the junkyard. The one with the rubber hoses labeled 12/13 on the image is really hard to get. You can possibly get it made at a hydraulic shop. I was lucky to have these in good shape and used it after a good cleaning and flushing. The line, #9 (UE7661467) from the evaporator to the receiver used to be available at RockAuto and still is as of right now, but as I said a lot of these lines are being discontinued. The line, #8 (UB3961462) from the condenser to drier used to be available at RockAuto. I see that it still is for now, and also on several other sites.
O-rings/Seals/Gasket kits
I ordered this from RockAuto Part # 26754
Adapter kit
This is the high and low side port adapters to convert over to R134A and I got these from Advanced Auto.
Refrigerant and Oils
As I stated above, these trucks and their AC systems were designed to use R12 and its most efficient if you do. This means it will cool quicker, and run lower pressures on the compressor and lines. R-12 is very hard to get these days, but it’s still out there. It can be really expensive sometimes $30 a for 12 oz. can on eBay. If you have a system in place and it just needs a
hose or something replaced, it might be a good idea to try and locate some and go back with it. I say this because the oils in the system for R-12 is mineral oil and its already in the condenser and evaporator already. It is a terribly idea to try and convert your current system with just some new R134a adapters and refrigerant. Mineral oil will not carry R134a refrigerant through the system. R134a will not mix well with the mineral oil and will eventually melt the black o rings, and clog up the system and ruin the compressor.
Since I was installing mine entirely from scratch, and I flushed and cleaned all my components along with some new parts, I chose to go with R134A. Again R12 is hard to obtain, costly, and in the event of a leak, it would be troublesome to redo.
The difference in how these two differ in function is that the R134A requires more pressure and the compressor is not made to efficiently compress the gas and the condenser in front of the radiator is not very large so it cannot dissipate the heat of the R134A as well. It will work and work well, it will just take a little longer to cool, run higher pressures which could cause leaks, and puts more of a demand on the compressor so this could shorten the life of it.
But with that said…works pretty good.
If you use R12 you will need 26.50 oz., so it’s best to get 3 or 4 of the 12 oz. cans. Also you will need a little dye to detect leaks, and some mineral oil for the compressor.
Capacities for R-12
R-12 26.50 ounces
Mineral oil 8 ounces for the entire system.
If you use R134A you will need two 12 oz. cans, as it calls for 80% of an R12 fill. You will need some dye and some PAG oil. They make a PAG 50,100, and 150 and I just went right in the middle with the 100. I used 8.6 oz.
Capacities for R134a
R134A 21.2 ounces
PAG 100 oil
Amount of lubricant to add to each individual component.
Condenser 1 oz.
Evaporator 2 oz.
Drier 1 oz.
Compressor 4.6 oz.
Any extra or overfill of oil will settle in the drier.
I added 4.6 oz. to the compressor and a 3 oz. oil charge along with about 1 oz. of dye through the lines.
This is a closed system so this is how the system lubricates itself and the compress lubricates itself.
Compressor
These trucks came with the Sanden 508 (1986-1988) and the Sanden 708 (1989-1993).
The 508 has 5 pistons and metal piston rings.
The 708 has 7 pistons and synthetic piston rings, which are supposed to last a lot longer and in the case of failure, there should be no metal to disperse into the system.
There is no point at all going too far without a proper working compressor, so I looked for a new one and noticed that most of the ones you can get from an auto parts store or from online stores like Rock Auto are re-manufactured ones. I purchased one from RockAuto and it failed in 3 days. Stay away from FourSeasons brand rebuilds. Do Not Recommend.
Compressors are incredibly hard to find new these days and its only getting harder. You can try eBay or google your heart out. I found a solid place called Ackits.com in Arizona.
I have ordered two new ones from this site and they work great.
If you can, I do suggest getting a brand new compressor.
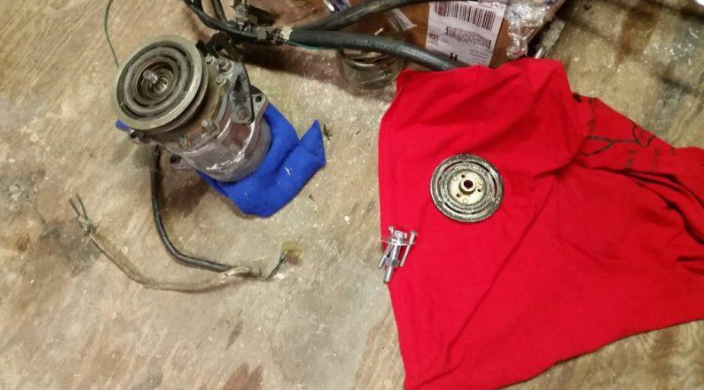
I was able to use a used compressor that came from a junkyard truck. When I inspected it the first thing I did was turn it clockwise with a socket wrench (19 mm) to see if it was seized up or not. It wasn’t, but it needed a main bearing as it was not moving so freely. The bearing is $25 at most local parts stores. I purchased mine at AutoZone and the part number is MT 2021 and its size is 35mm x 55mm x 20mm.
You will need a puller to take it apart, and some pliers for the spring clips. Look it up in the manual on how to service and take apart the compressor as you will need to thoroughly clean a used one. You will also want to flush the oil that is in it and refill it to the proper amount with the proper oil and that depends on the refrigerant used. If you are really lucky and can get your hands on R-12, that refrigerant uses mineral oil. I think 5 oz. of it in the compressor itself. This is to be measured. If you are using R134A you will want to flush as much of the old left over mineral oil from the compressor as possible and refill with PAG oil. To flush, I put an old grill over a bucket and opened the only one drain plug it has and let it drain overnight. I also turned it by hand occasionally to try and pump some out. Some also came out of the line ports on the back of the compressor so I turned it up on its end and let it drain from there too. I would fill and flush with PAG oil a few times to make sure the old was out. You will waste some oil and money doing this, but its necessary. You really do not want to mix these oils as it could gel and possibly stop up your expansion valve destroying all of your hard work.
O-Rings
Replace all the O-rings with new HNBR green ones.
Black O-rings for the R-12 and the green ones in the kit for R134A.
Just be sure to lubricate them with the refrigerant oil that you will be using. Its best to use NYLOG as it’s not as hygroscopic as the PAG oil. PAG oil is very Hygroscopic meaning that it will absorb moisture from the air. So always keep your cap on the bottle when not in use.
Cleaning
When cleaning, always wear safety glasses. You will want to flush and blow out each line that you intend to use, the condenser even if its new, and the evaporator with an AC cleaner solvent or denatured alcohol. This is very important and you can rent the tool from your local auto supply house.
I used mineral spirits to start with and later flushed again with denatured alcohol. Look at what this old evaporator can look like after many years of use.
Here it is cleaned and new expansion valve added.
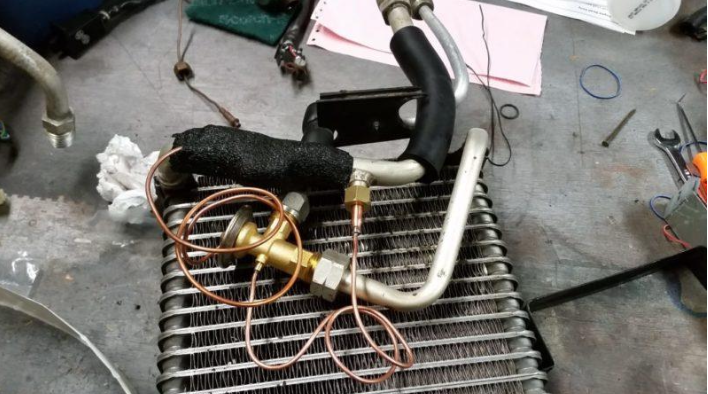
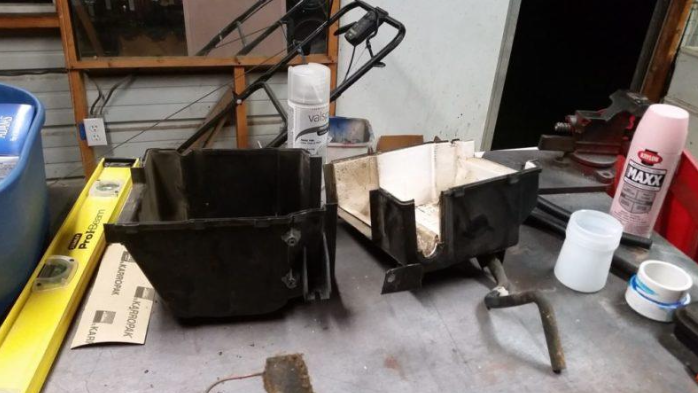
I took apart the evaporator box and cleaned it thoroughly and re-gasket a lot of it with the AC foam tape from Walmart. I also used the same foam tape on the blend doors under the dash to make a better seal. The old material had disintegrated over the years.
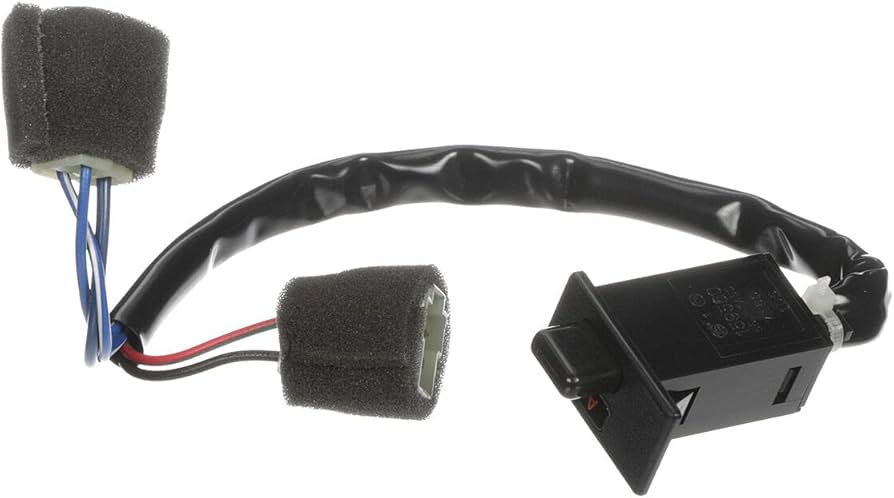
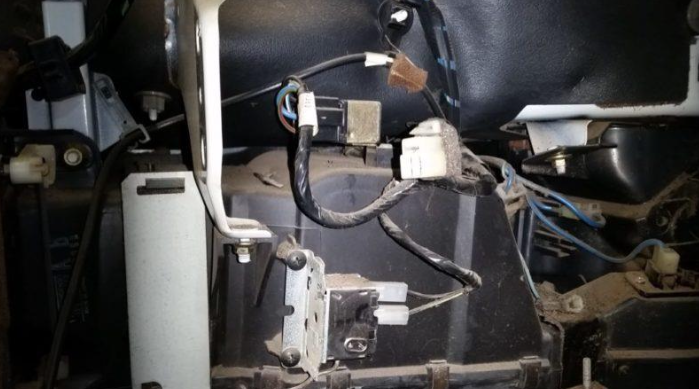
The all-important AC dash switch and AC relay
The dash switch goes for about $70 on eBay, but you may can find one in a junkyard. Also while you are at it, in a junkyard, pull all the components you think you will need including the AC relay that sits on top of the evaporator box.
Now that have all of this information its time to install everything.
Install all the lines and components and make sure everything is tight. Cross check everything. Now with your gauges and pump, pull a vacuum for 4-6 hrs., some will say that is excessive but you really want this to be right.
I mean how many times do you want to do this?
This will boil out all the solvents and moisture. While doing this keep an eye on the oil level of the pump. Next close the valves on your gauges and turn off your pump and it should hold around 26-29 inHG. Let it sit for a while, maybe even an entire day and make sure the needle does not move at all. If it doesn’t move, you have an air tight system with no leaks and now you can proceed with charging it. Some go a step further and charge it with nitrogen (thats dry air) to make sure that it doesn’t leak with pressure vs that of a vacuum but I didn’t have any.
This is very important if you are using the really expensive R12 because you do not want to waste any of that. You want to be absolutely certain your system is sealed and ready for the refrigerant.
To Recap what you will need to do:
- Remove all of the lines, compressor and condenser. Evaporator removal is optional but it really helps to clean all of the funk from the evaporator case and check the foam seals.
- Solvent flush everything but NOT the compressor and old accumulator (drier). You will be replacing the drier. Dry with LOTS of compressed air.
- Oil flush the compressor with the oil you plan to use in the system. It would be best to replace the compressor shaft seal, but I didn’t do this.
- Reassemble the system with all new HNBR O-rings and new drier.
- Add 8 oz. of oil to the system. I used PAG-100. You can use ester oil if you do not take the system completely apart and flush it, but I think this is a weak attempt at doing the job right and would advise against it. Ester oil blends with old mineral oil. PAG will not.
- Evacuate the system (vacuum pump) and charge with R134a. It usually takes 80% of the R12 amount but you can tweak it as needed. For me this was two 12 oz. cans. This actually put 22.6 oz. in my system. (update: I later discovered that optimally, 19-20 oz was best)
- Aim for pressures: 2.8 times ambient temp on the High side, and ~30 on the low side (1500 rpm, max AC, high blower, and doors open)
Hopefully after doing all of this, you are now a semi AC pro enjoying some cold Air Conditioning in your truck.
I sure hope this was helpful to someone.
I probably forgot a few things or left out something important.
If I do I will come back and edit accordingly.
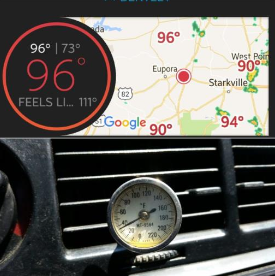
8/2/2016 Pressures Recorded after my complete install of AC components Refrigerant R134A
Ambient Temp 93 F
Heat Index 107 F
Humidity 55% Time 12:00 PM
1500 rpm
Compressor ON
Low side = 30 psi
High side = 274 psi
Dash Center Vent temp 38-40 F
ORIGINAL PRESSURES WITH R12 Ambient temp 77F
Low Pressure 14-24 psi
High Pressure 149-185 psi
This will also work on a B2000 or B2600.

Leave a Reply